Game Bloggers
- Details
-
 By Peter Enzinger
 - Category: Uncategorised
Your local Junk Removal, Hauling & Transport Company
Creating Value through Professional Cleaning Services
Our primary mission at Blackstone Property Services is to add significant value to your property through our professional Junk removal, Hauling, Transport, and Pressure Washing services. We understand the importance of maintaining a clean and appealing property image, and we dedicate our expertise to meet the everyday demands of property cleanliness. Learn more about our Mission and Vision Statements.
Our Commitment to Exceptional Service
At the heart of our operations lies a core principle: to provide exceptional property cleaning services that offer the best value for our clients. We believe that a clean property is not just an aesthetic choice, but a testament to the owner’s commitment to quality and professionalism.
Expertise that Protects and Enhances Your Property
Our team of real estate property cleaning professionals takes a unique approach to their work. We aim to protect and enhance our client’s properties over the long term, leveraging our extensive knowledge of property cleaning, coupled with proprietary tools and techniques. Our goal is to help our clients realize the full potential of their investment.
A Legacy of Excellence and Customer Satisfaction
With a proud legacy of serving over 1,000 clients in the Bay Area, Blackstone Property Services has built its foundation on high standards of excellence and unwavering commitment to customer satisfaction. We believe that our success is measured by the satisfaction of our clients, and we strive to exceed their expectations at every turn.
You need it gone, we'll make it GONE... in a hurry!
What we offer
Junk Removal
Starting at just $75
Hauling
Starting at just $150
Transport
Starting at just $500
Pressure Washing
Starting at just $75
Window Cleaning
Starting at just $150
Solar Panel Cleaning
Starting at just $250
Request an Appointment
- Details
-
 By admin
 - Category: Uncategorised
Welcome to B3Zone Video Presentation System!
Discover the powerful features that make our platform the ultimate tool for trainers and students.
Take a tour to see how it works.
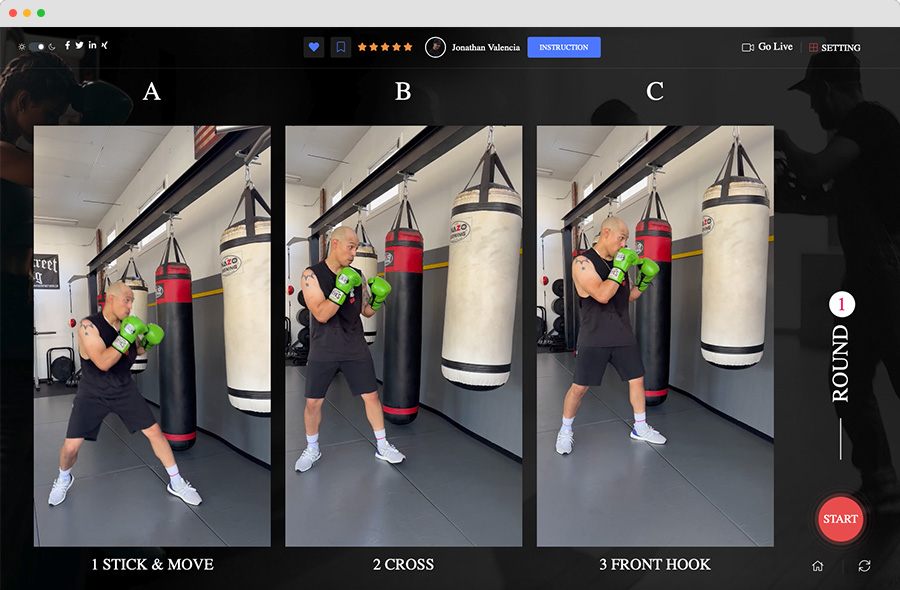
I. Video Presentation System Features
Welcome to the heart of our Boxing Studio Video Presentation System. Discover how our dynamic features revolutionize your training experience. From multi-video playback to personalized themes, we've got it all covered to elevate your workouts and learning sessions.
1. Multi Video Playback
Enjoy the flexibility of playing multiple videos simultaneously on a single screen. This feature is perfect for analyzing different aspects of your training or comparing techniques side by side.
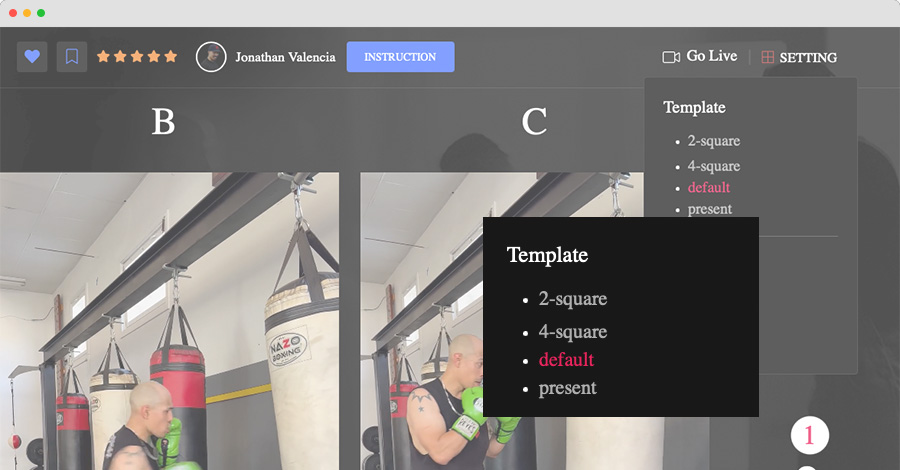
2. Multi layouts
Tailor your viewing experience with four layout options. Choose the "default" layout for a balanced view, opt for "1 video layout" for a focused perspective, go for "2 video layout" to compare two videos seamlessly, or select "4 video layout" to create a comprehensive training dashboard.
- default
- 2 videos
- 4 videos
- present - 1 video
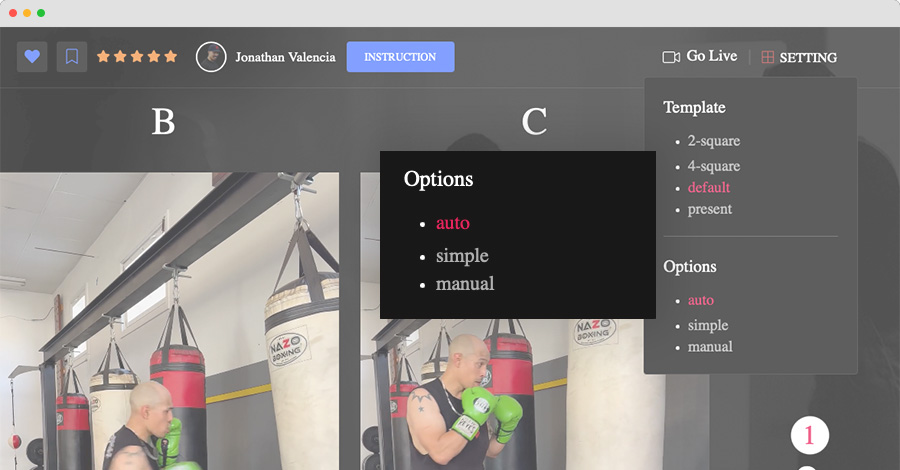
3. Multi play options
Take control of your training with three playback options. Use "Auto Play" for a hands-free experience, switch to "Manual" to control video playback at your own pace, or simplify the process with "Simple" mode for uninterrupted training sessions.
- default
- auto
- manual
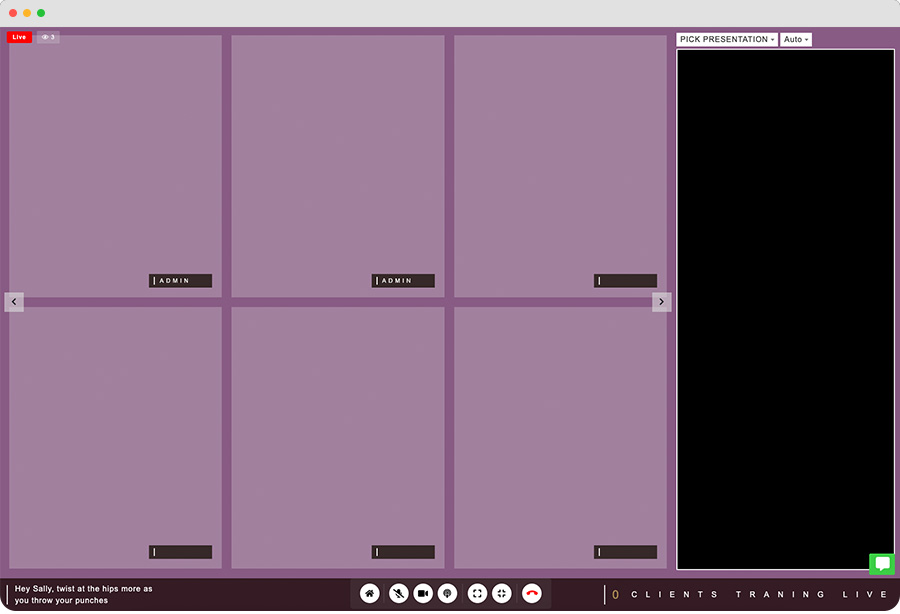
4. Live Streaming
Experience real-time training like never before. Trainers can livestream their sessions, and students can join from anywhere, ensuring that you never miss a valuable training session.
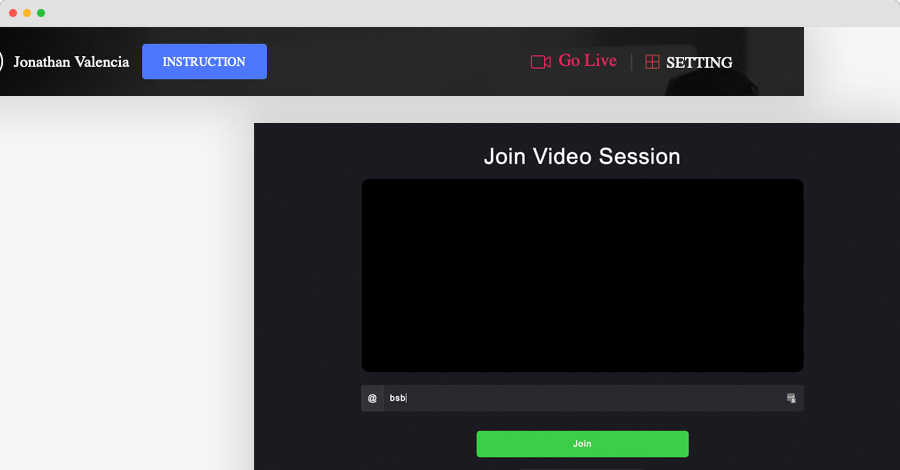
Live stream view
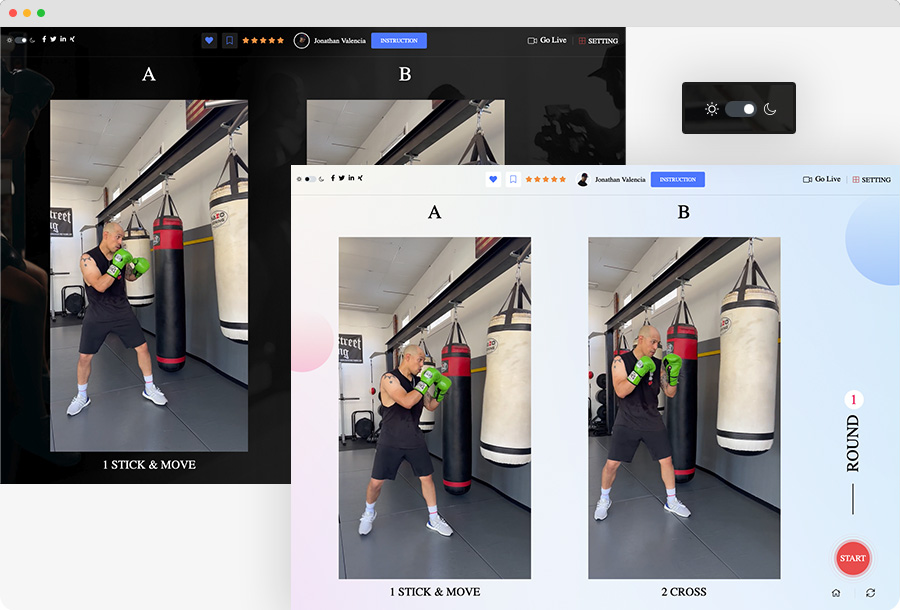
5. Dark theme and light theme
Customize your viewing experience with "Dark" and "Light" themes. Whether you prefer a sleek, dark background or a bright, clean interface, we've got you covered.
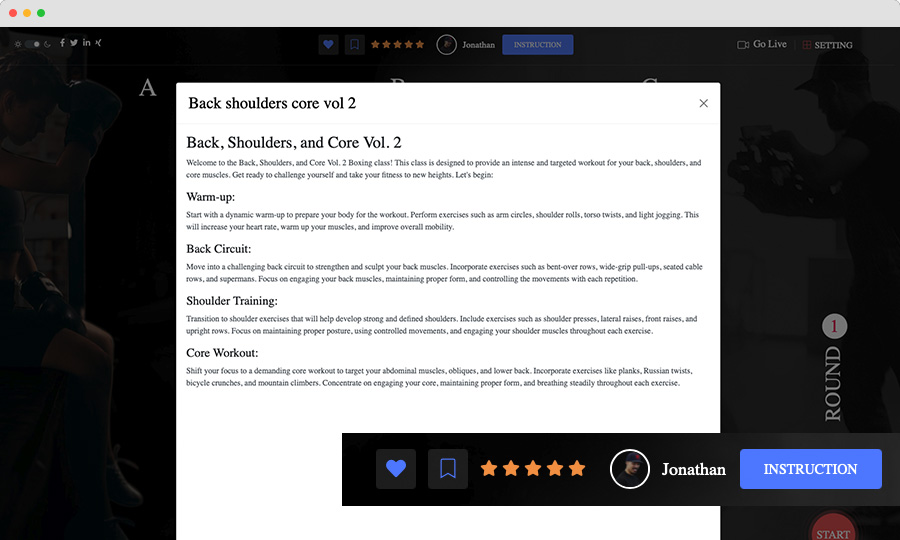
6. Class Instruction
Access comprehensive class instructions to enhance your training. Our system provides step-by-step guidance and tips to help you maximize the benefits of each session.
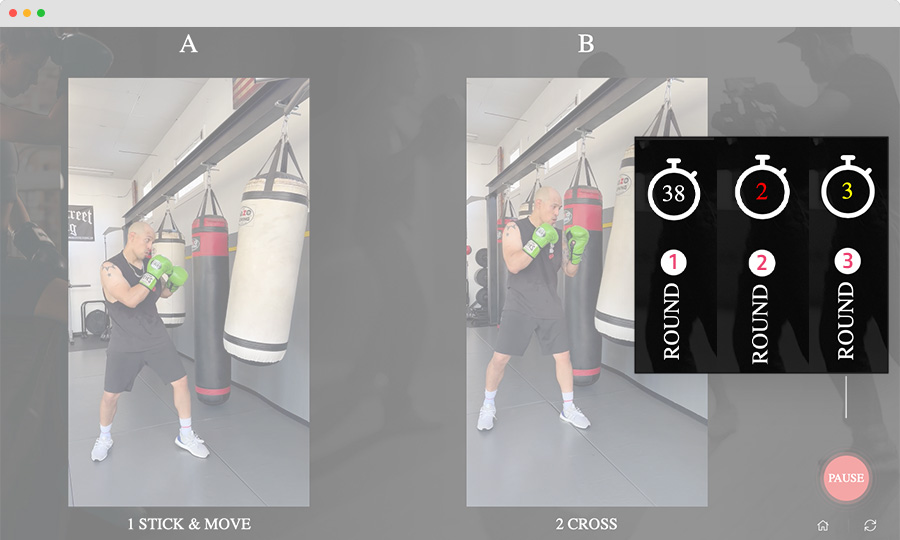
7. Rounds Feature
Organize your workouts effectively with the "Rounds" feature. Create structured training sessions with designated rounds, ensuring that your workouts are both challenging and well-structured.
8. Rating system
Share your feedback and rate video presentations. This feature enables a collaborative learning environment where trainers can continuously improve their content based on user reviews.

9. Add to Wishlist
Never lose track of your favorite classes. Add them to your wishlist for easy access and a personalized training experience.
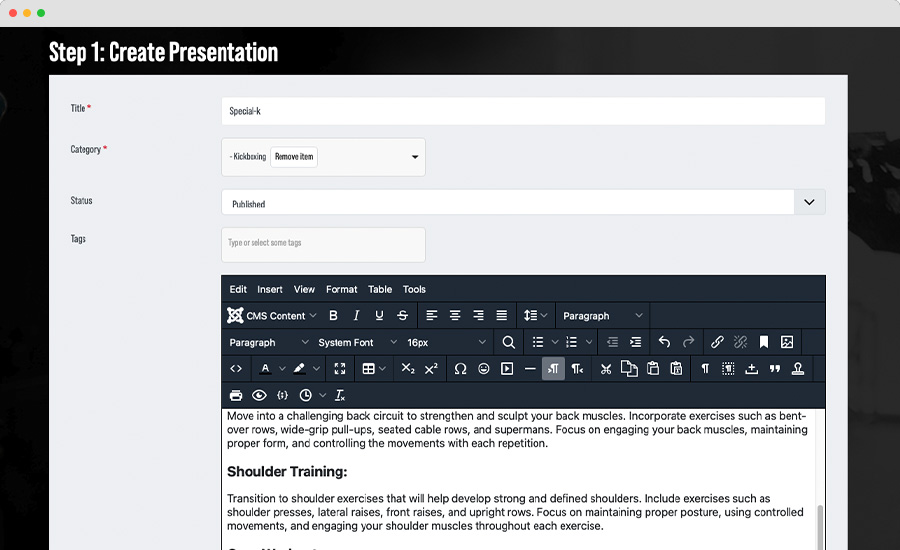
II. Video Presentation Builder
Unlock your creativity and training potential with our Video Presentation Builder. Trainers, this is your canvas to craft captivating learning materials. Explore how easy it is to upload, edit, and share your expertise with students through our intuitive interface.
1. Trainer-Created Content
Empower trainers to share their knowledge through video presentations. Our platform allows trainers to create and share their unique content, making learning more engaging and personalized.
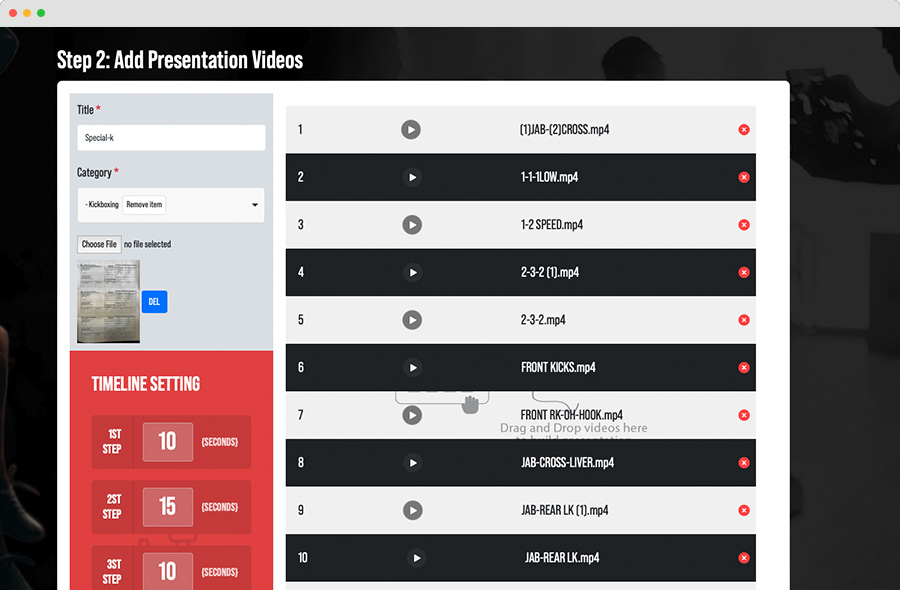
2. Videos Drag and Drop
Effortlessly build engaging presentations with our intuitive drag-and-drop interface. Arrange videos in your preferred order to create a seamless learning experience.

3. Video Format Compatibility
No need to worry about video formats. Our system supports all video formats, ensuring that trainers can share their content without any limitations.

4. Video compression
We optimize video presentations for performance. Our video compression technology ensures that you can enjoy high-quality videos without sacrificing speed or performance.
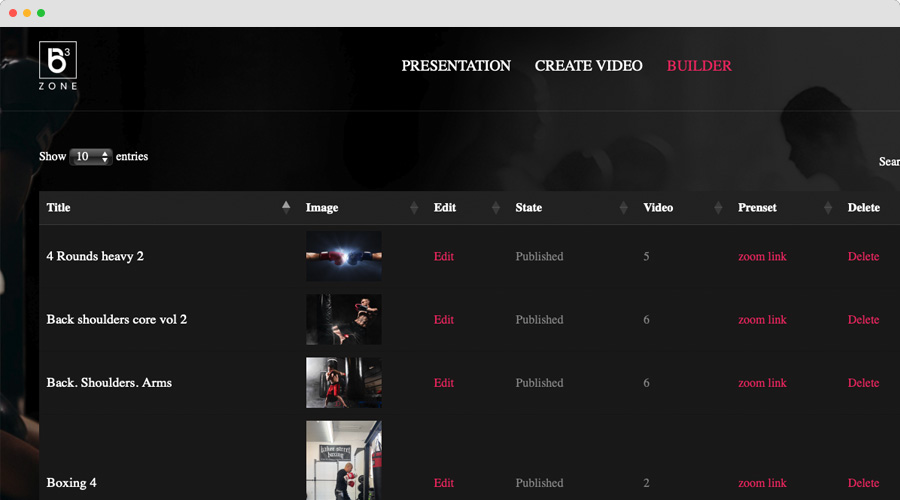
5. Presentation Management
Easily manage your video presentations. Edit or delete them as needed to keep your content up to date and relevant.
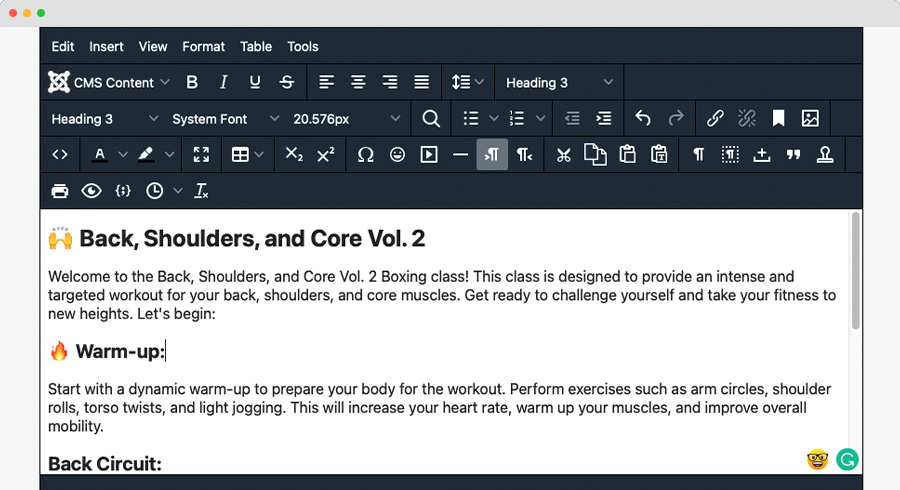
6. Instruction Editor
Add your personal touch to video presentations by including instructions, annotations, and insights. Customize content to cater to your unique teaching style.
III. Beautiful Layout
Presentation is key, and in this section, we dive into the elegant layout of our system. Seamlessly organize your content, find what you need, and explore various categories. Discover how we've designed a visually pleasing and user-friendly experience for you.
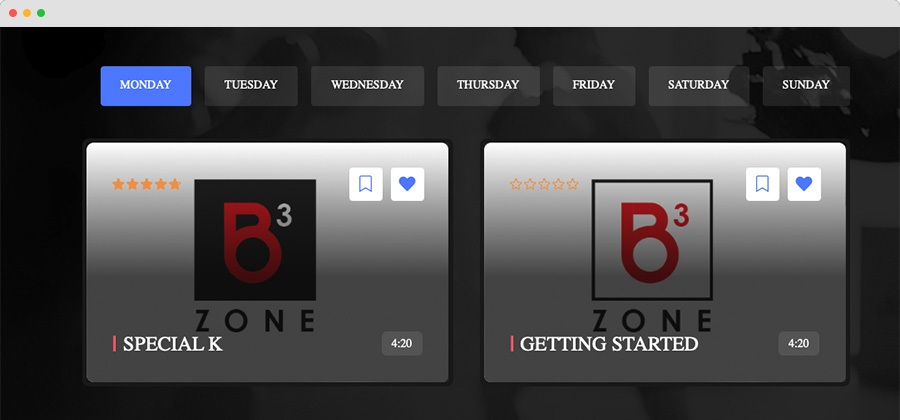
1. Presentation Timeline
Navigate your video presentations effortlessly with our presentation timeline. View and filter presentations by days, ensuring you can find the content you need when you need it.
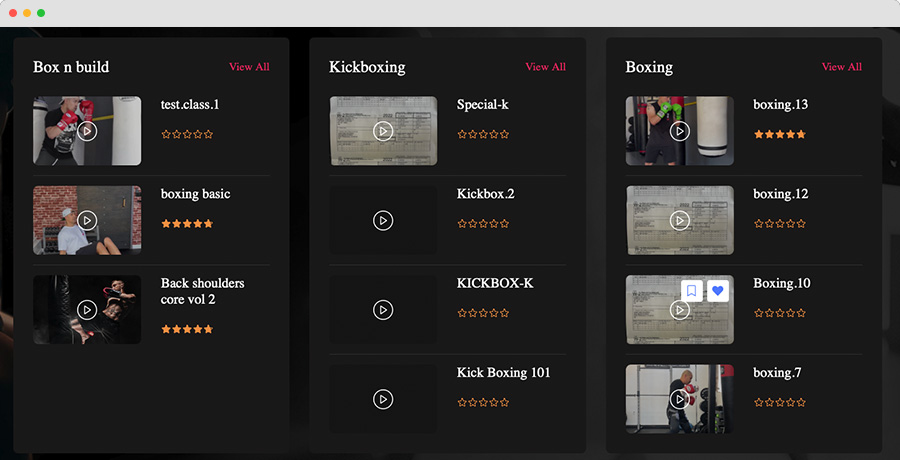
2. Category Grouping
Stay organized with category grouping. Presentations are neatly categorized, making it easy to find the specific type of content you're looking for, whether it's boxing techniques, fitness routines, or nutrition advice.
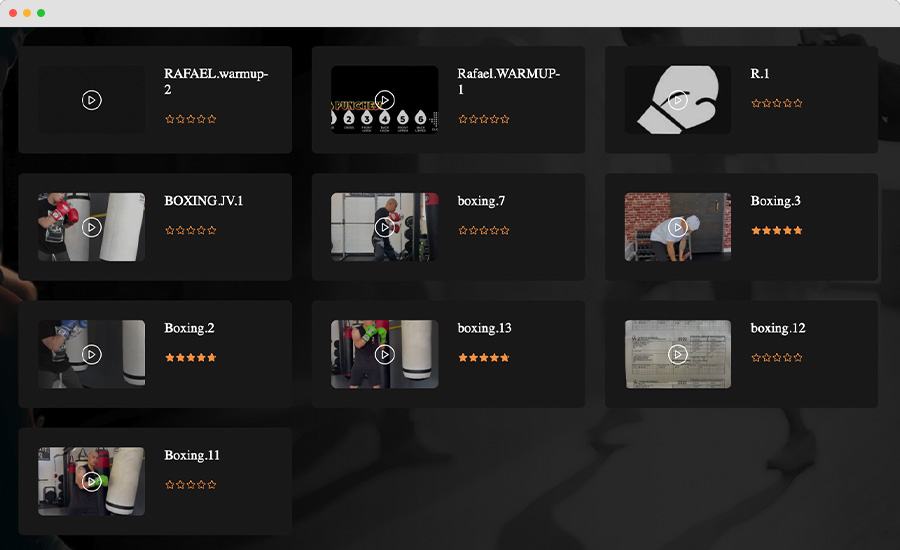
3. Category View
Explore a curated list of all available presentations within a specific category. This view allows you to dive deep into your area of interest, making it easier to discover valuable training resources.
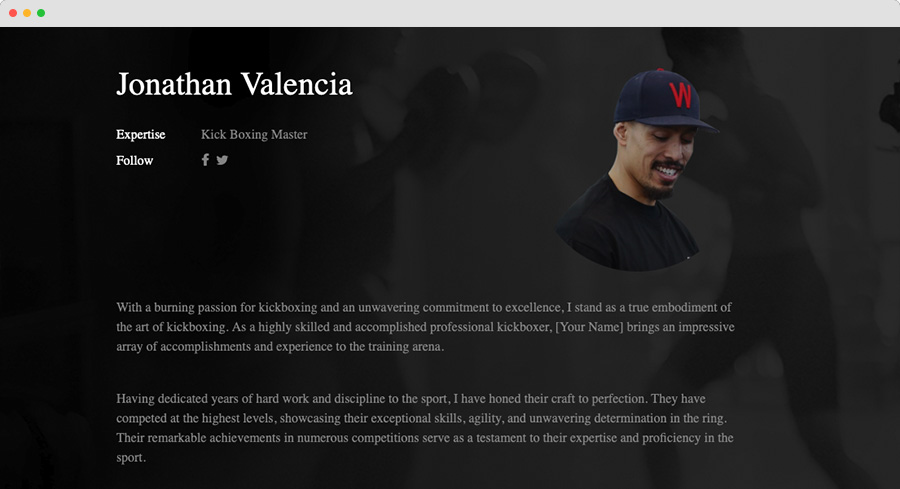
IV. Trainer Profiles
In this section, you'll get to know the talented trainers who bring their expertise to our platform. Dive into their profiles to find the perfect match for your training needs. Learn about their backgrounds, training philosophies, and the unique content they offer. Make informed decisions on which trainers to follow and collaborate with by exploring their detailed profiles.
1. Trainer Directory
Discover a diverse community of trainers who specialize in various aspects of boxing and fitness. Our directory provides you with a comprehensive list of trainers to choose from.
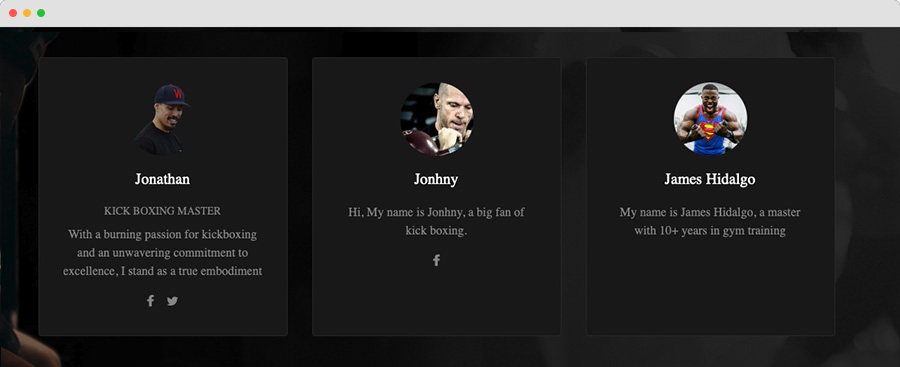
2. Trainer Profiles
Get to know your trainers better by exploring their detailed profiles. Access information about their credentials, experience, training philosophy, and the content they offer. This helps you make informed decisions when selecting a trainer to follow or learn from.
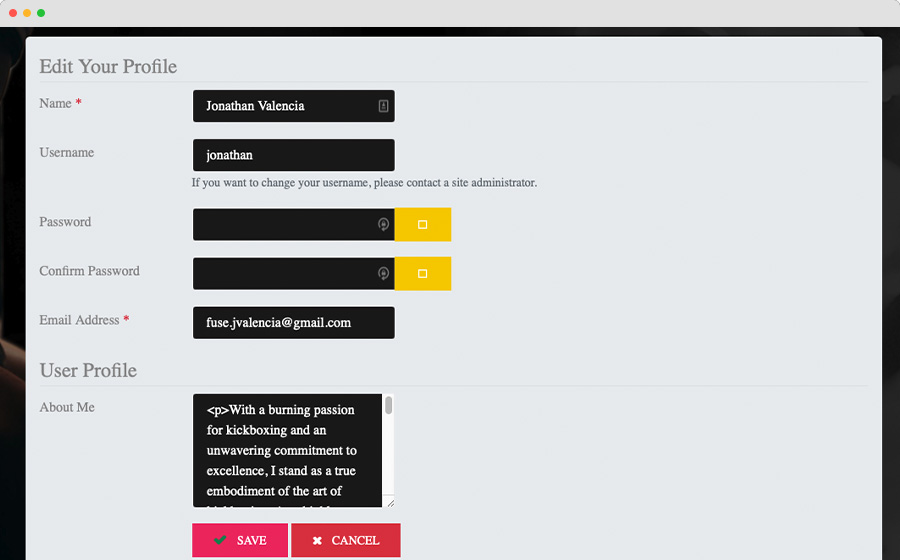
3. Trainer Profile edit
Trainers can take full control of their profiles. With the ability to update their own information, trainers can keep their profiles current and relevant. Whether it's adding new certifications, showcasing recent accomplishments, or modifying contact details, trainers can ensure that students have access to the most up-to-date and accurate information. This feature empowers trainers to maintain a professional and engaging presence on our platform.
- Details
-
By admin
- Category: Uncategorised

- Details
-
By admin
- Category: Uncategorised

- Details
-
By admin
- Category: Uncategorised
Headings
All HTML headings, <h1> through <h6>, are available.
| Heading | Example |
|---|---|
|
|
h1. Bootstrap heading |
|
|
h2. Bootstrap heading |
|
|
h3. Bootstrap heading |
|
|
h4. Bootstrap heading |
|
|
h5. Bootstrap heading |
|
|
h6. Bootstrap heading |
.h1 through .h6 classes are also available, for when you want to match the font styling of a heading but cannot use the associated HTML element.
h1. Bootstrap heading
h2. Bootstrap heading
h3. Bootstrap heading
h4. Bootstrap heading
h5. Bootstrap heading
h6. Bootstrap heading
Customizing headings
Use the included utility classes to recreate the small secondary heading text from Bootstrap 3.
Display headings
Traditional heading elements are designed to work best in the meat of your page content. When you need a heading to stand out, consider using a display heading—a larger, slightly more opinionated heading style.
| Display 1 |
| Display 2 |
| Display 3 |
| Display 4 |
Lead
Make a paragraph stand out by adding .lead.
Vivamus sagittis lacus vel augue laoreet rutrum faucibus dolor auctor. Duis mollis, est non commodo luctus.
Inline text elements
Styling for common inline HTML5 elements.
You can use the mark tag to highlight text.
This line of text is meant to be treated as deleted text.
This line of text is meant to be treated as no longer accurate.
This line of text is meant to be treated as an addition to the document.
This line of text will render as underlined
This line of text is meant to be treated as fine print.
This line rendered as bold text.
This line rendered as italicized text.
.mark and .small classes are also available to apply the same styles as <mark> and <small> while avoiding any unwanted semantic implications that the tags would bring.
While not shown above, feel free to use <b> and <i> in HTML5. <b> is meant to highlight words or phrases without conveying additional importance while <i> is mostly for voice, technical terms, etc.
Text utilities
Change text alignment, transform, style, weight, and color with our text utilities and color utilities.
Abbreviations
Stylized implementation of HTML’s <abbr> element for abbreviations and acronyms to show the expanded version on hover. Abbreviations have a default underline and gain a help cursor to provide additional context on hover and to users of assistive technologies.
Add .initialism to an abbreviation for a slightly smaller font-size.
attr
HTML
Blockquotes
For quoting blocks of content from another source within your document. Wrap <blockquote class="blockquote"> around any HTML as the quote.
Lorem ipsum dolor sit amet, consectetur adipiscing elit. Integer posuere erat a ante.
Naming a source
Add a <footer class="blockquote-footer"> for identifying the source. Wrap the name of the source work in <cite>.
Lorem ipsum dolor sit amet, consectetur adipiscing elit. Integer posuere erat a ante.
Alignment
Use text utilities as needed to change the alignment of your blockquote.
Lorem ipsum dolor sit amet, consectetur adipiscing elit. Integer posuere erat a ante.
Lorem ipsum dolor sit amet, consectetur adipiscing elit. Integer posuere erat a ante.
Lists
Unstyled
Remove the default list-style and left margin on list items (immediate children only). This only applies to immediate children list items, meaning you will need to add the class for any nested lists as well.
- Lorem ipsum dolor sit amet
- Consectetur adipiscing elit
- Integer molestie lorem at massa
- Facilisis in pretium nisl aliquet
- Nulla volutpat aliquam velit
- Phasellus iaculis neque
- Purus sodales ultricies
- Vestibulum laoreet porttitor sem
- Ac tristique libero volutpat at
- Faucibus porta lacus fringilla vel
- Aenean sit amet erat nunc
- Eget porttitor lorem
Inline
Remove a list’s bullets and apply some light margin with a combination of two classes, .list-inline and .list-inline-item.
- Lorem ipsum
- Phasellus iaculis
- Nulla volutpat
Description list alignment
Align terms and descriptions horizontally by using our grid system’s predefined classes (or semantic mixins). For longer terms, you can optionally add a .text-truncate class to truncate the text with an ellipsis.
- Description lists
- A description list is perfect for defining terms.
- Euismod
-
Vestibulum id ligula porta felis euismod semper eget lacinia odio sem nec elit.
Donec id elit non mi porta gravida at eget metus.
- Malesuada porta
- Etiam porta sem malesuada magna mollis euismod.
- Truncated term is truncated
- Fusce dapibus, tellus ac cursus commodo, tortor mauris condimentum nibh, ut fermentum massa justo sit amet risus.
- Nesting
-
- Nested definition list
- Aenean posuere, tortor sed cursus feugiat, nunc augue blandit nunc.
Responsive typography
Responsive typography refers to scaling text and components by simply adjusting the root element’s font-size within a series of media queries. Bootstrap doesn’t do this for you, but it’s fairly easy to add if you need it.
Here’s an example of it in practice. Choose whatever font-sizes and media queries you wish.
Text alignment
Easily realign text to components with text alignment classes.
Ambitioni dedisse scripsisse iudicaretur. Cras mattis iudicium purus sit amet fermentum. Donec sed odio operae, eu vulputate felis rhoncus. Praeterea iter est quasdam res quas ex communi. At nos hinc posthac, sitientis piros Afros. Petierunt uti sibi concilium totius Galliae in diem certam indicere. Cras mattis iudicium purus sit amet fermentum.
For left, right, and center alignment, responsive classes are available that use the same viewport width breakpoints as the grid system.
Left aligned text on all viewport sizes.
Center aligned text on all viewport sizes.
Right aligned text on all viewport sizes.
Left aligned text on viewports sized SM (small) or wider.
Left aligned text on viewports sized MD (medium) or wider.
Left aligned text on viewports sized LG (large) or wider.
Left aligned text on viewports sized XL (extra-large) or wider.
Text wrapping and overflow
Prevent text from wrapping with a .text-nowrap class.
For longer content, you can add a .text-truncate class to truncate the text with an ellipsis. Requires display: inline-block or display: block.
Text transform
Transform text in components with text capitalization classes.
Lowercased text.
Uppercased text.
CapiTaliZed text.
Note how text-capitalize only changes the first letter of each word, leaving the case of any other letters unaffected.
Font weight and italics
Quickly change the weight (boldness) of text or italicize text.
Bold text.
Normal weight text.
Light weight text.
Italic text.
.text-primary
.text-secondary
.text-success
.text-danger
.text-warning
.text-info
.text-light
.text-dark
.text-muted
.text-white
Contextual text classes also work well on anchors with the provided hover and focus states. Note that the .text-white and .text-muted class has no link styling.
Background color
Similar to the contextual text color classes, easily set the background of an element to any contextual class. Anchor components will darken on hover, just like the text classes. Background utilities do not set color, so in some cases you’ll want to use .text-* utilities.
Dealing with specificity
Sometimes contextual classes cannot be applied due to the specificity of another selector. In some cases, a sufficient workaround is to wrap your element’s content in a <div> with the class.
Conveying meaning to assistive technologies
Using color to add meaning only provides a visual indication, which will not be conveyed to users of assistive technologies – such as screen readers. Ensure that information denoted by the color is either obvious from the content itself (e.g. the visible text), or is included through alternative means, such as additional text hidden with the .sr-only class.
- Details
- Category: Uncategorised
It's easy to get started creating your website. Knowing some of the basics will help.
What is a Content Management System?
A content management system is software that allows you to create and manage webpages easily by separating the creation of your content from the mechanics required to present it on the web.
In this site, the content is stored in a database. The look and feel are created by a template. Joomla! brings together the template and your content to create web pages.
Logging in
To login to your site use the user name and password that were created as part of the installation process. Once logged-in you will be able to create and edit articles and modify some settings.
Creating an article
Once you are logged-in, a new menu will be visible. To create a new article, click on the "Submit Article" link on that menu.
The new article interface gives you a lot of options, but all you need to do is add a title and put something in the content area. To make it easy to find, set the state to published.
Template, site settings, and modules
The look and feel of your site is controlled by a template. You can change the site name, background colour, highlights colour and more by editing the template settings. Click the "Template Settings" in the user menu.
The boxes around the main content of the site are called modules. You can modify modules on the current page by moving your cursor to the module and clicking the edit link. Always be sure to save and close any module you edit.
You can change some site settings such as the site name and description by clicking on the "Site Settings" link.
More advanced options for templates, site settings, modules, and more are available in the site administrator.
Site and Administrator
Your site actually has two separate sites. The site (also called the front end) is what visitors to your site will see. The administrator (also called the back end) is only used by people managing your site. You can access the administrator by clicking the "Site Administrator" link on the "User Menu" menu (visible once you login) or by adding /administrator to the end of your domain name. The same user name and password are used for both sites.
Learn more
There is much more to learn about how to use Joomla! to create the website you envision. You can learn much more at the Joomla! documentation site and on the Joomla! forums.
Donec nec justo eget felis facilisis fermentum aliquam porttitor mauris.